Arduino Control LED Simulator with Wokwi
ตัวอย่างการเขียน Code เพื่อควบคุมการสว่างของหลอดไฟในแบบต่างๆ
โดยจะฝึกใช้ บนบอร์ด Arduino nano และ บอร์ดESP32 โดยจะฝึกใช้บน Simulator Wokwi
เว็บที่ใช้ในการ Simulator wokwi.com
LED changing pattern: A
Step 1. Initially, only one LED (at index=0) is ON, and the rest of the LEDs are OFF.
Step 2. The position of the ON LED should be moved to the next in a circular manner in a fixed time interval and then repeat
รูปแบบที่ 1 เป็นรูปแบบทีหลอด LED จะเริ่มดับทั้งหมด และค่อยติดทีละดวง และเลื่อนไปติดทีละ 1 ดวงเรื่อยๆ
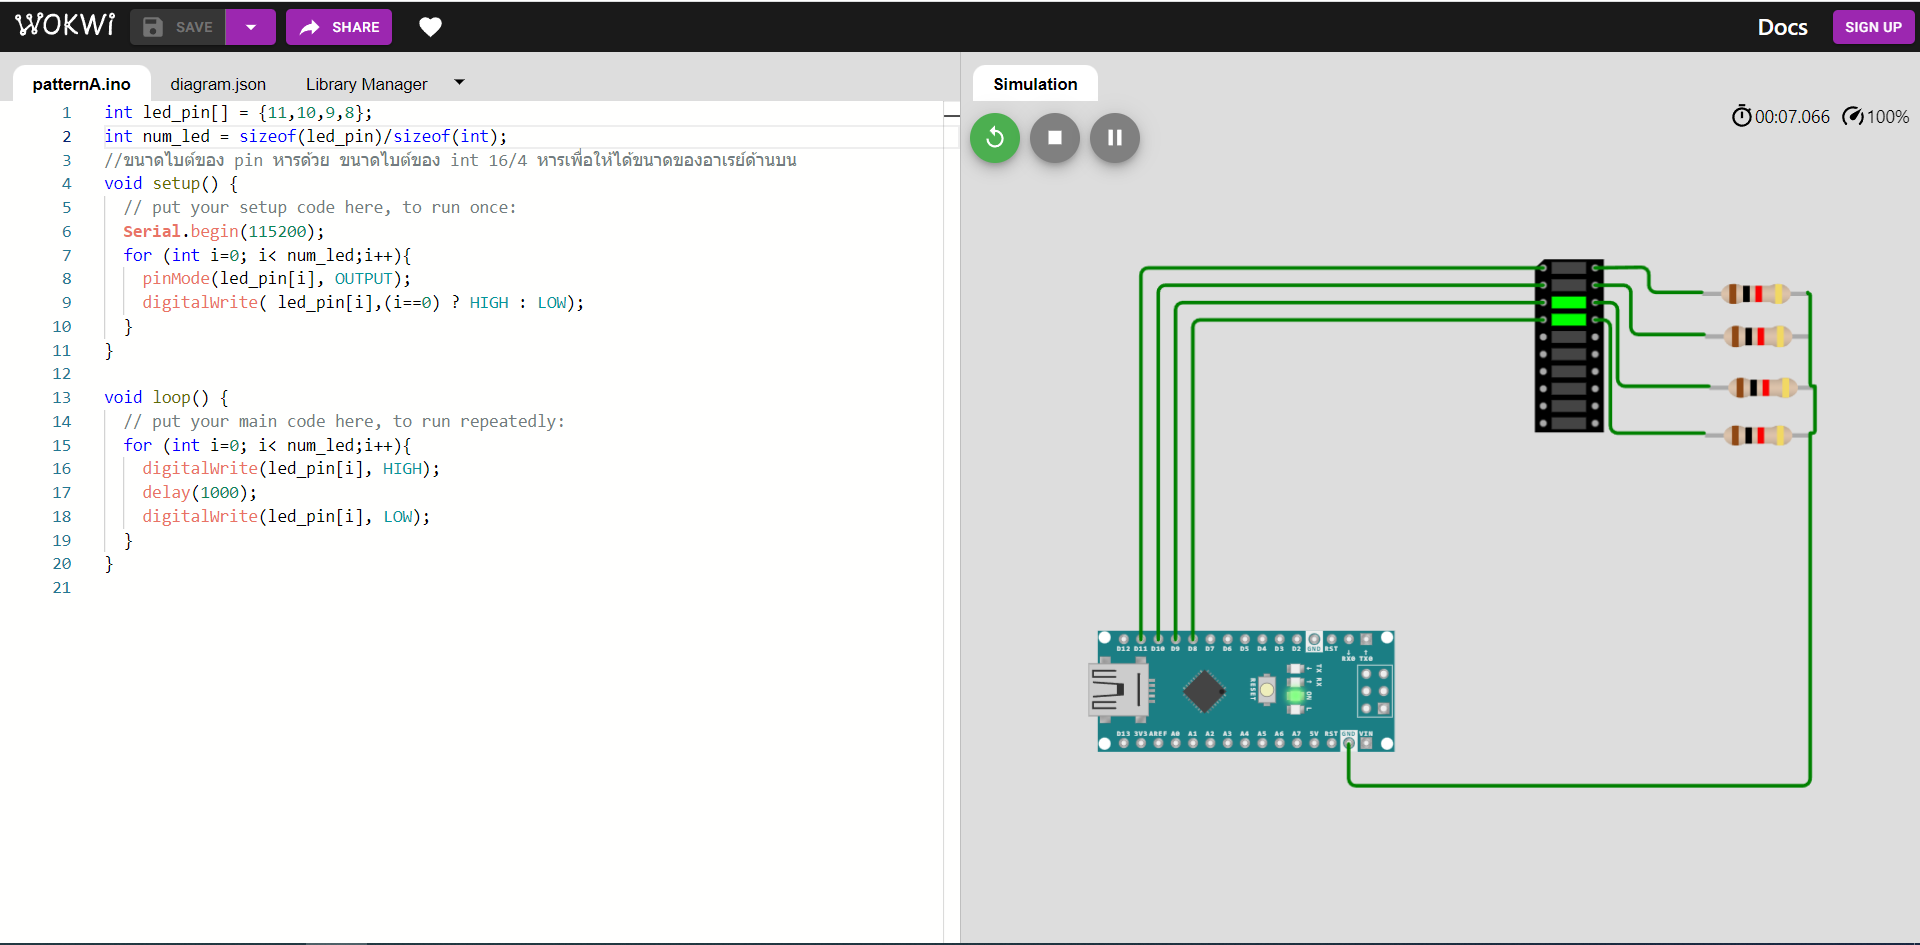
Code ที่ใช้
int led_pin[] = {11,10,9,8};
int num_led = sizeof(led_pin)/sizeof(int);
//ขนาดไบต์ของ pin หารด้วย ขนาดไบต์ของ int 16/4 หารเพื่อให้ได้ขนาดของอาเรย์ด้านบน
void setup() {
  // put your setup code here, to run once:
  Serial.begin(115200);
  for (int i=0; i< num_led;i++){
    pinMode(led_pin[i], OUTPUT);
    digitalWrite( led_pin[i],(i==0) ? HIGH : LOW);
  }
}

void loop() {
  // put your main code here, to run repeatedly:
  for (int i=0; i< num_led;i++){
    digitalWrite(led_pin[i], HIGH);
    delay(1000);
    digitalWrite(led_pin[i], LOW);
  }
}
LED changing pattern: B
Step 1. Initially, all LEDs are OFF.
Step 2. Turn on the LEDs one by one with a time delay, starting at index=0 until all LEDs are ON.
Step 3. If all LEDs are ON, turn off LEDs one by one starting at index=n-1, where n is the total number of LEDs, until all LEDs are OFF, and repeat Steps 2-3.
เป็นรูปแบบที่ หลอด LEDเริ่มจากดับทั้งหมดแล้วจะค่อยๆติดทีละดวง และเพิ่มจำนวนขึ้นไปเรื่อยๆ เมื่อ LED ติดทั้งหมด จะค่อยๆ ดับทีละดวงจนดับทั้งหมด
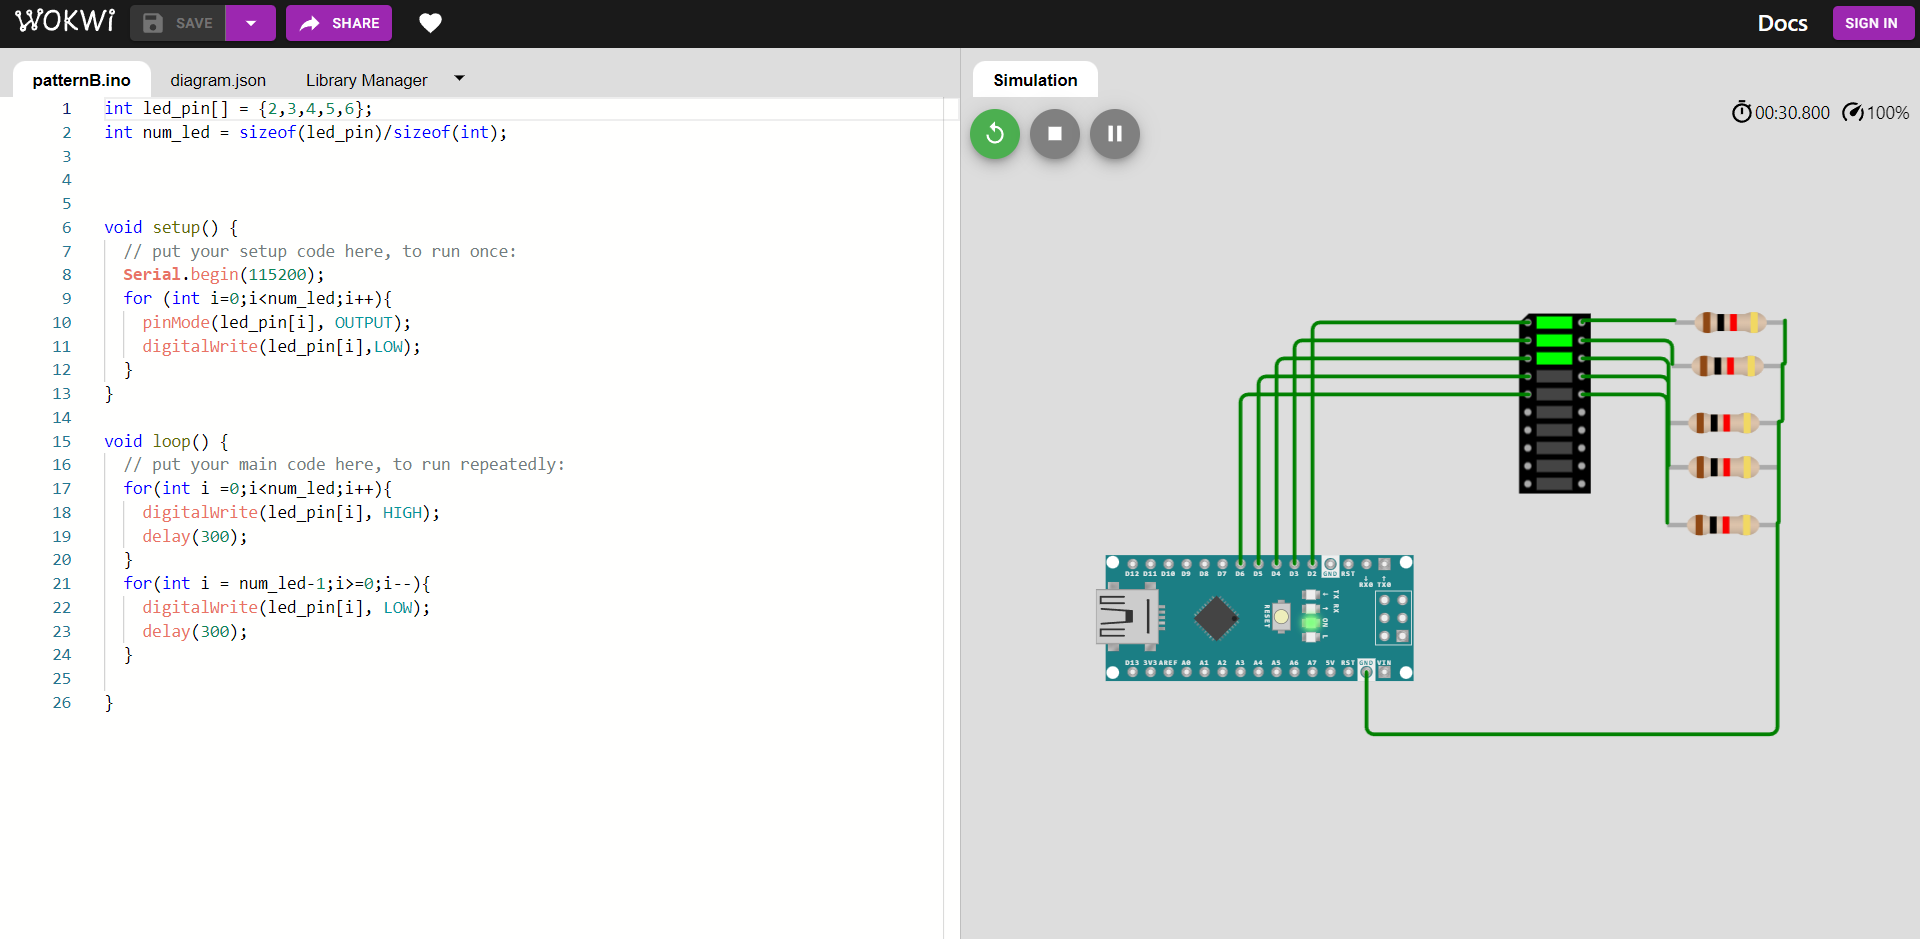
Code ที่ใช้
int led_pin[] = {2,3,4,5,6};
int num_led = sizeof(led_pin)/sizeof(int);


void setup() {
  // put your setup code here, to run once:
  Serial.begin(115200);
  for (int i=0;i<num_led;i++){
    pinMode(led_pin[i], OUTPUT);
    digitalWrite(led_pin[i],LOW);
  }
}

void loop() {
  // put your main code here, to run repeatedly:
  for(int i =0;i<num_led;i++){
    digitalWrite(led_pin[i], HIGH);
    delay(300);
  }
  for(int i = num_led-1;i>=0;i--){
    digitalWrite(led_pin[i], LOW);
    delay(300);
  }

}
LED changing pattern: C
Step 1. Initially, all LEDs are OFF.
Step 2. Turn on the first LED by increasing the duty cycle of the PWM signal driving the LED, until the LED is fully ON.
Step 3. Repeat Step 2 with the next LED until all LEDs are fully ON.
Step 4. If all LEDs are ON, turn off LEDs one-by-one by decreasing the duty cycles of the PWM signals until all LEDs are OFF and repeat Steps 2-4.
ในรูปแบบที่3 เป็นรูปแบบที่หลอด LED แต่ละดวงจะค่อยๆติด จนติดทั้งหมด แล้ว LED จะค่อยๆดับจนดับทั้งหมด
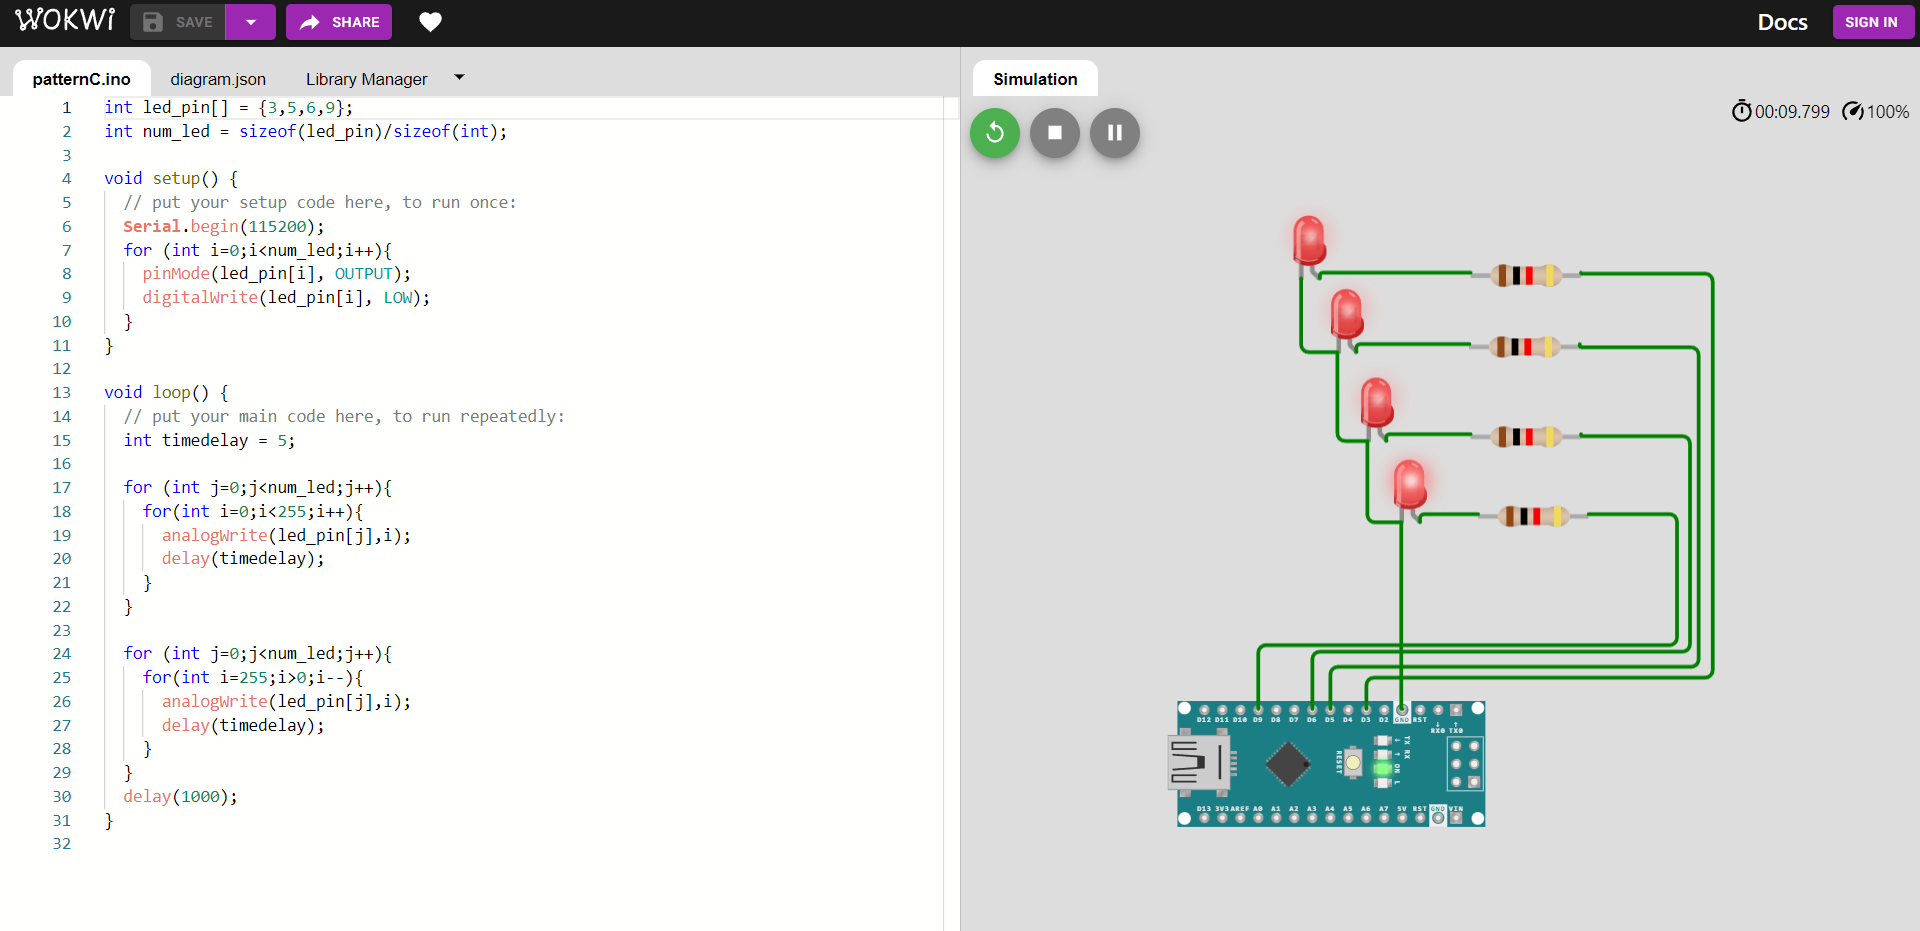
Code ที่ใช้
int led_pin[] = {3,5,6,9};
int num_led = sizeof(led_pin)/sizeof(int);

void setup() {
  // put your setup code here, to run once:
  Serial.begin(115200);
  for (int i=0;i<num_led;i++){
    pinMode(led_pin[i], OUTPUT);
    digitalWrite(led_pin[i], LOW);
  }
}

void loop() {
  // put your main code here, to run repeatedly:
  int timedelay = 5;

  for (int j=0;j<num_led;j++){
    for(int i=0;i<255;i++){
      analogWrite(led_pin[j],i);
      delay(timedelay);
    }
  }

  for (int j=0;j<num_led;j++){
    for(int i=255;i>0;i--){
      analogWrite(led_pin[j],i);
      delay(timedelay);
    }
  }
  delay(1000);
}
LED changing pattern: D
Step 1. Initially, all LEDs are OFF.
Step 2. Turn on the first 4 LEDs using PWM signals, each with different duty cycles (e.g. 100%, 50%, 25%, 10%), and the rest of the LEDs are OFF.
Step 3. Move the positions of ON LEDs to the left by one position in a circular manner and repeat Step 3.
ในรูปแบบนี้เป็นรูปแบบที่ LED ติดพร้อมๆกันหลายๆดวง โดยที่แต่ละดวงจะค่อยๆสว่างขึ้น แล้วจะค่อยเลื่อนไปติดที่ดวงต่อไปเรื่อยๆ

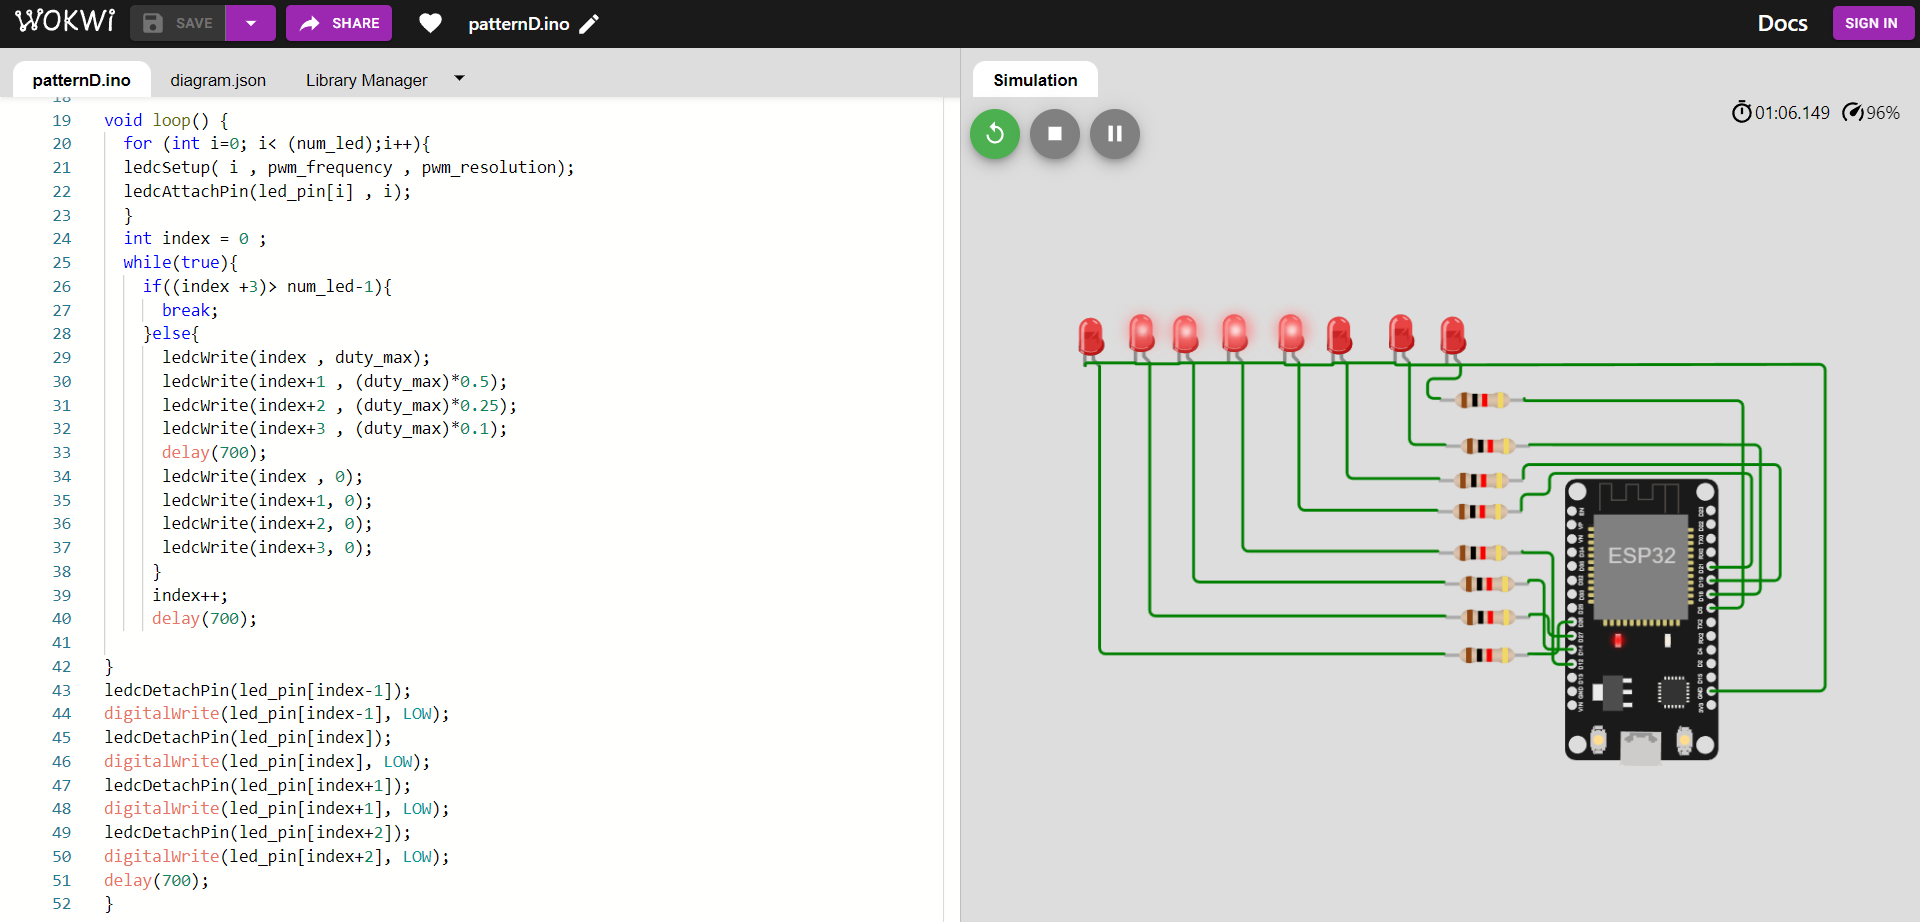
Code ที่ใช้
const int led_pin[] = {5,18,19,21,12,14,27,26};
const int num_led = sizeof(led_pin)/sizeof(int);

#define OFF (HIGH) //Low Led

void setup() {
  for (int i=0; i< num_led;i++){
    pinMode(led_pin[i], OUTPUT);
    digitalWrite(led_pin[i], OFF );

  }
}


const int pwm_resolution = 8;
const int pwm_frequency = 10000;
const int duty_max = (1<<pwm_resolution);

void loop() {
  for (int i=0; i< (num_led);i++){
  ledcSetup( i , pwm_frequency , pwm_resolution);
  ledcAttachPin(led_pin[i] , i);
  }
  int index = 0 ;
  while(true){
    if((index +3)> num_led-1){
      break;
    }else{
      ledcWrite(index , duty_max);
      ledcWrite(index+1 , (duty_max)*0.5);
      ledcWrite(index+2 , (duty_max)*0.25);
      ledcWrite(index+3 , (duty_max)*0.1);
      delay(700);
      ledcWrite(index , 0);
      ledcWrite(index+1, 0);
      ledcWrite(index+2, 0);
      ledcWrite(index+3, 0);
     }
     index++;
     delay(700);

}
ledcDetachPin(led_pin[index-1]);
digitalWrite(led_pin[index-1], LOW);
ledcDetachPin(led_pin[index]);
digitalWrite(led_pin[index], LOW);
ledcDetachPin(led_pin[index+1]);
digitalWrite(led_pin[index+1], LOW);
ledcDetachPin(led_pin[index+2]);
digitalWrite(led_pin[index+2], LOW);
delay(700);
}